• A few people have been scammed on the site, Only use paypal to pay for items for sale by other members. If they will not use paypal, its likely a scam NEVER SEND E-TRANSFERS OF ANY KIND.

more rack work and saddlebags

StratTuner

Site Supporter
Joined
Mar 11, 2013
Messages
3,490
Reaction score
58
Points
48
Location
California
Visit site
Dear Friends,
I've spent some time working on the pvc supports for saddlebags.
The original idea was not mine, but I've expanded on it.

The problem with saddle bags is that they want to drape into the wheel well.
There needs to be something to keep them out, so starting with a single 3/4 inch PVC pipe
run across the wheel well, I added two more (upper and lower) and then a bottom support
for the bags as well.

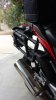
Here's what the structure looks like assembled and on the ground.
IMG_1206.jpg
the parts in white are the most recent.
The lower supports aren't meant to bare substantial weight! The straps that
hold the bags to the hand grips do that. The lower supports do keep the bags from
drooping down as much.

The half braces in the front are not load baring. They are lined with two pieces of rubber
from a bicycle inner tube to protect the frame.
IMG_1207.jpg
the half pipe brace is held on by pressure from the bags alone, but I did add a single, loose,
zip tie that is on the frame all the time and slides over the half pipe when the frame is
attached. I slide it off the PVC when removing the structure. The zip tie not tight at
all and is there just to keep the half piece from coming off the frame.

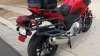
When it's attached, it looks like this.
IMG_1204.jpg
NB: There is a nylon strap that at the front end of the structure that goes from the hand
rail to the center, horizontal, bar. While the PVC piping IS NOT meant to bare the weight
of a loaded saddle bag, it seemed wise to add this extra support. It was easy to add and
cost very little.

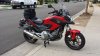
The rear of the structure is connected to a single horizontal that sits just above the
license plate frame. If you thread the pipe carefully it will snug against the bolts in the
tail sect. Again, it's not load baring, but it SOLID.

That right rear elbow you can see is the only joint that is not glued or POP-riveted. That is
the place that comes apart so that the whole structure can come off both sides. I've drilled a
hole through it and secure it with a single zip tie when attached. I've considered using a metal
lynch pin here, but the zip tie shows no fatigue, and (to make the point again), the pvc structure
isn't LOAD BARING.
IMG_1208.jpg

The last pictures I'll post will be of the bags connected and RESTING against the pvc.
(I'll have to go and take those pics after I get the bags on, and that won't happen until
I've finished my morning coffee! Those pics will be here in a couples hours.)

BAGS: The Duffel bags I described in earlier articles work well here.
I have two that I've fitted with inserts made from foam-core tag board that give the
bags some kinda shape even when empty.

The bags I got as gifts this year are Nelson Rigg CL-885 and they are amazing!
At $115 for both, they are an excellent choice. All the straps are in the right places
on the sides and on the bottom and ALL QUICK RELEASE! It's a pleasure to work
with bags that were actually made for this purpose.

More pictures on the way....
 
I'm going to jump on the bandwagon here, too. This whole setup looks nice, and so does the price. I really like how the Honda bags integrate, but they are so expensive! This is certainly a very viable option. I love rigs like this that are so cheap you can go through many trial and error revisions until you hone in on exactly what works best for you, rather than the closest thing a manufacturer makes.
 
many thanks.

If an NC700x owner implemented the pvc frame with the Walmart Duffel bags... it could be a very cheap alternative to more expensive bags.
 
Last edited:
Here are two modifications that help when carrying a lot of weight in the bags:

1: the yellow shows where to attach a nylon strap (just like the one at the front end shown in the picture.)
2: the red shows where to put in 1/2 inch wood screws on BOTH sides of the pipe joining, and on both sides of the bike.

I also put in four pop rivets at EVERY seam where two pipes are joined together, two pop rivets on each side go into pre-drilled holes.
That took a lot of time, but it seems worth it.

IMG_1204b.jpg
 
Last edited:
GREAT JOB StratTuner:cool:
Would you mind telling us what the actual cut length is on
1) the long PVC piece running from front to back NOT including the 90's
2) the piece running across the back by the license plate NOT including the 90's.
3) what size are the 2 angled split T's

This looks like a fun and very useable project

Thanks :D

1) 14 inches
2) 9 and 1/4 inch
3) 3/4 inch to 1 inch
(1 inch part doesn't matter too much since you'll cut that in half anyway....)

the split T's were a problem. the part of the "T" that connects to the rest of the rack has to be 3/4 inch since that's what all the pvc pipe fittings are.... 3/4 inch.

the half pipe that fits over the motorcycle's tubes really ought to be 1 inch or bigger since the diameter of that motorcylce tube is bigger than 1 inch.
I had to use a hack saw to make them half pipes. Fortunately, PVC pipe saws easily.

The pipe that goes right above the license plate slides in just under the two hex-head bolts you can see nearest the top. Very snug fit and perfect for this application.

I'd like to say that I measured everything with precision, but I didn't. I remember the first "fitting" I did was to make sure the long pipe going from the license-plate elbow to the half T was level when sitting in place... so start there. (smile)

If you'd like photos of anything assembled or on the ground, I will do my best to accomodate.
 
Last edited:
THANKS StratTuner! :)
I have a feeling there will be a number of these racks cruising around the country (world?) soon.
It's a lot of fun, and some frustration too, coming up with a simple and useful farkle to add to a bike.
Your efforts are greatly appreciated!
 
THANKS StratTuner! :)
I have a feeling there will be a number of these racks cruising around the country (world?) soon.
It's a lot of fun, and some frustration too, coming up with a simple and useful farkle to add to a bike.
Your efforts are greatly appreciated!

Thank you for the kind words. I hope I can be some small help to someone.
 
Hey StratTuner
I have finished my set of racks based on your design and hard work. :)
I made 3 changes to your version though.
1) The bottom part of the racks that stick out to the side, I made them extend outward a bit more, about 7 1/2 inches total.
2) The same bottom portion as #1, I left the 2 joints on the outside of the tees unglued so that I can tilt the whole base up to make the bike skinnier when I'm not carrying any bags. I figured this would be a convenient option if the bags were left in the motel and I didn't want to remove the entire assembly. It keeps my butt nice & skinny. :D
3) I painted the entire thing a flat black. I'll post pics tomorrow.

A question for you. Have you used yours enough to determine if the exhaust heat is any sort of issue to the left side rack?
This would be simple enough to mitigate if that was the case.

Thanks again for a fun and VERY useful project.

The rack right above the exhaust (right side of motorcycle) has about one inch clearance even with the loaded bags on. After a cross country tour, there was no problem with heat after running the NC twelve hours a day for five days.

I keep a zip tie on the frame tube where the rack half pipes rest. When put the rack on, I slip the closed zip tie down over the rack half pipe. It's loose enough that I can do this by hand, and it keeps the half pipes on the frame tube.

I will be away from home for a week, but now that you've asked, I'll go back and do a photo step by step of how I attach the racks/bags.
The bags and the rack can go on and off in 5 minutes.

Photo lay out... coming in one week!

I can't wait to see your photos!

NB: Watch for joints that separate when fully loaded, heavy, bags bounce on them for hours at a time. Painting them black is cool because when a joint starts to separate, it shows up white and very obvious. Did you use screws, pop rivets, or anything to re-enforce the connects? I would... and did.
 
Hey StratTuner
All the joints that NEED to remain connected are glued and locked in with self tapping sheet metal screws. Hard to imagine them going anywhere, but they will be checked regularly.
Here are 3 pics of my completed and mounted racks. One shows the base tilted up out of the way and secured with double sided Velcro to keep them from possibly vibrating down (although they are pretty darn snug to move).
 

Attachments

  • 20140719_075842.jpg
    20140719_075842.jpg
    100 KB · Views: 701
  • 20140719_080012.jpg
    20140719_080012.jpg
    98.6 KB · Views: 736
  • 20140719_091109.jpg
    20140719_091109.jpg
    96.2 KB · Views: 741
Hey StratTuner
All the joints that NEED to remain connected are glued and locked in with self tapping sheet metal screws. Hard to imagine them going anywhere, but they will be checked regularly.
Here are 3 pics of my completed and mounted racks. One shows the base tilted up out of the way and secured with double sided Velcro to keep them from possibly vibrating down (although they are pretty darn snug to move).

Wow! I hit the link to this post, and my jaw dropped! It looks great! I'm glad you took the time to put in screws and not pop rivets.

The 3/4 inch PVC fits so well under the reflector and above the licenese plate. The bolt heads snug it in place as if they were made for that. I originally had the right elbow by the plate with no screws or glue. I drilled a hole through the elbow and the horizontal over the plate and threaded a zip tie through. Adding the rear nylon quick release made that redundant.... but that's still the place whre the whole thing comes apart at removal time.

I especially like the folding sides! I'm going to steal that idea next time I make these.
How do you keep the folding side from rotating toward the ground past horizontal?
The flat black color worked really well!

What bags do you plan for the racks?


I run two more nylon straps (quick release) just to be safe... not sure if they're needed, but here's where I have them (in blue).
20140719_075842a.jpg
I know this sort of home-made thing isn't for everyone, but you made it look really good!.... AND you probably didn't spend hundreds of dollars on the project. I hope they serve you well.
 
Last edited:
Back
Top