• A few people have been scammed on the site, Only use paypal to pay for items for sale by other members. If they will not use paypal, its likely a scam NEVER SEND E-TRANSFERS OF ANY KIND.

OEM Saddlebag and Carrier Installation

PortlandZinMan

Site Supporter
Premium Member
Joined
Nov 20, 2016
Messages
339
Reaction score
1
Points
18
Location
Portland, OR
Visit site
Oh boy...

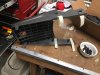
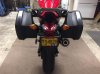
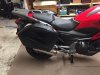
I finally got all the parts to install the OEM saddlebags and I bought from another member here. I bought the carrier rack as well as all the brackets. As I opened the boxes, I found no installation instructions were included. Being a smart internet sort, I was able to locate and print all six sets of instructions.

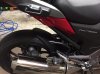
I am not a mechanic or handyman, I'll admit. Going through the instructions, I see cutting, gluing, filing, templates and drilling large holes in my plastic are all involved in the installation ... not a simple "bolt on" process. It seems daunting. I tried searching for help, but nothing specific is out there. Anyone here do this recently and can point me in the right direction as to helpful hints (like where do I start?)...

Another question - the set of instructions for the carrier and the set for the side saddlebag brackets both include the new grab rail install - do I install the carrier or the side brackets first?

I am definitely going to wait for the weekend - I don't want to start this unless I can get all the way through it.

If you can't help, I could sure use a few "good luck, mate" messages...
 
Last edited:
I my be wrong but I think I remember someone saying the instructions make it look a lot worse then it is. I specially remember someone asking about cutting the plastic for the grab bar and another member here saying he didn't have to he just pushed it out of the way. Good luck, take your time and compare pics also not just the diagrams. I have the OEM side cases and can post a couple of pics later if you want
 
I my be wrong but I think I remember someone saying the instructions make it look a lot worse then it is. I specially remember someone asking about cutting the plastic for the grab bar and another member here saying he didn't have to he just pushed it out of the way. Good luck, take your time and compare pics also not just the diagrams. I have the OEM side cases and can post a couple of pics later if you want

I would love to see a few photos without the bags installed.... Thanks in advance!
 
Plastic needs to be trimmed on 2012 model only. Later models require no trimming.
 
FYI my NC is a 2012
0f328bc43f2bede8cfb08f7f390619e0.jpg
0b718922c8beebee5bf239bd8263b24e.jpg
93beaf934db5df72b3e372747964a6e4.jpg
ba00a471da7ab70fdb7254b842796736.jpg
2407dd73413ce9c46220652ba70f9368.jpg
 
Last edited:
As Greg said, only the '12 needed plastic trimming. To put the rear carrier plate on, I found it handy (necessary, really) to loosen the grab rail(s) to get it inserted between them without marring or flexing things excessively. I had no instructions, but it wasn't that big a deal once I realized I just needed to loosen the rail(s).
 
Well, the night ended in supreme frustration. I dropped 2 important parts that are now lost somewhere in the innards of the bike - after taking off most of the plastic, I was unable to locate the missing hardware. On top of that, a very simple "hint" would be to install the upper brackets for the side bags to the grab rails BEOFRE installing them - once I spent all the time mounting the grab rails and rear carrier, I found that attaching the saddlebag upper brackets almost impossible. If the instructions would have recommended installing them before mounting them to the bike, it would have been a huge time and dropped parts savings. I am hitting the part ordering site and then the whiskey. Total failure tonight. I am too old for this. I am about to turn in my man card.
 
Well, the night ended in supreme frustration. I dropped 2 important parts that are now lost somewhere in the innards of the bike - after taking off most of the plastic, I was unable to locate the missing hardware. On top of that, a very simple "hint" would be to install the upper brackets for the side bags to the grab rails BEOFRE installing them - once I spent all the time mounting the grab rails and rear carrier, I found that attaching the saddlebag upper brackets almost impossible. If the instructions would have recommended installing them before mounting them to the bike, it would have been a huge time and dropped parts savings. I am hitting the part ordering site and then the whiskey. Total failure tonight. I am too old for this. I am about to turn in my man card.

You'll have to get some generic parts from the hardware store or an online shop if you don't want to buy the whole kit again. Something like 99% of the parts for the OEM baggage mounts are not listed, and last I searched someone said they were unable to get them sourced from their honda dealer. Of course it doesn't hurt to try, but I wouldn't hold my breath.
 
Don't feel so bad. I'm somewhat of a DIY guy and don't usually run into problems overhauling newkclear reactors and fitting motorcycle luggage but twice I've dropped hardware into the black hole under the NC700X gas tank when installing luggage racks.

I have a small magnet on a telescoping stick for this type of mistake we all do sometime or the other and I was able to fish the things out and stay sober over it.

The tool is something else to buy but the next time it happens you will have the tool. Why would anyone have a magnet on a stick unless they dropped something in a black hole.

Gotta review how to collect tools - first 40 seconds here:

https://www.youtube.com/watch?v=2OzMMh9fWDc
I would like to add get the one with the collar around the magnet (so it doesn't stock to everything metal, like the car, truck or motorcycle your working on) I've also got a couple of those cable with the three pronged grabber (squeeze the plunger it opens, release and it closes) besides dropping hardware I've lost a few sockets and wrenches. I've turned a few quick projects into dissecting a vehicle looking for my tool LOL
fa082b7103f56f18a88b23d00061c4b9.jpg
8447db63d10b8a52110c207a10492908.jpg
 
Last edited:
Installation and Lessons Learned

Well, I finished installing the grab rails, carrier and saddlebags. Total time, 2 days, 3 hours each day. A majority of that time was redoing the same work several times due to either a part getting lost in the debth of the engine bay or I had to backup and redo thing because I hit a roadblock. Note: The instructions SUCK!

Lesson one - make sure you have the latest version of the installation instructions. They are different (2012 and everything else).

Here we go...

IMG_5338.jpg

I do a great job getting this all done - no issues at all! Then it is time to install the upper brackets for the saddlebags. The problem is, there is NO room to get your hands in to add washers and sleaves and then thread the nuts. I try to get cute but finally lost a nut in the bodywork. I took everything off, found the nut and this time mounted the upper saddlebag brackets to the new grab bar BEFORE reinstalling it on the bike. During that reinstall, I of course, lose one of the sleaves that you need to (re)mount the grab rails ... I never did find that and that was the end of day one.

(it is going to make me do this in multiple messages)
 

Attachments

  • IMG_5336.jpg
    IMG_5336.jpg
    91.3 KB · Views: 406
So I learned to use masking tape to hold those sleeves in place while installing the rails and carrier.

IMG_5342.jpgIMG_5345.jpg

So like I said, mount those upper saddlebag brackets to the grab rail BEFORE install the rail on the bike.
 
Next tip - when installing the lower guide rails, thread the bolts/sleeves/washers on the top that go into the fender FIRST and leave them very loose. Then to the same for the bolts/sleeves/washers that attach to the footpeg bracket. Learned this the hard way!
 

Attachments

  • IMG_5347.jpg
    IMG_5347.jpg
    91.4 KB · Views: 404
Leave the lower guide loose until you actually have the bags installed and then tighten them - do this one at a time. And here is the finished product. Tomorrow I start primer and painting the saddlebag panels to match the bike.
 

Attachments

  • IMG_5354.jpg
    IMG_5354.jpg
    93.9 KB · Views: 411
  • IMG_5351.jpg
    IMG_5351.jpg
    91.9 KB · Views: 350
Looks good and thanks for the tips on installing the rear rack, I'm still planning on getting one
 
If you ever find that sleeve laying around, send me a pic--the original owner of my bike lost two (and the nuts and bolts that went with them), so I'll be needing a replacement. Well, either sleeves or the spacers...haven't disassembled it to look, but the whole top rack rattles because of it. I figure he didn't torque the bolts or use loctite, and they rattled off on the road.
 
Glad you got it together! My saddlebags were mounted when I bought the bike, else I'd have been able to pass along the helpful tip about the mount. :)
 
Back
Top