• A few people have been scammed on the site, Only use paypal to pay for items for sale by other members. If they will not use paypal, its likely a scam NEVER SEND E-TRANSFERS OF ANY KIND.

Valve adjustment

Heyeugenio

Member
Joined
Dec 14, 2020
Messages
31
Reaction score
44
Points
18
Location
Sf Bay Area
Visit site
So, I was feeling rather ambitious this morning after having watched THE video and reading several threads.

I attacked the nc700x wearing 12,046 miles with tools, interwebz and coffee in hand.

I meticulously laid out my tools, including sockets, feeler gauges, ratcheting wrenches, etc etc. so that when the light turned green (wife heading off to work) I could just get cracking.

And a crackin’ I went; loosened out covers, blah blah blah (it’s been detailed ad nauseum) from start to finish including warm-up and burping of cooling system, I clocked in at just about an hour.

Rather interesting as I believed it would’ve taken a bit longer as this was my first time working on valves for the nc700x.
I had done some suspension work (cranked up the preload; installed stock side stand and standard rear links) but I’m sure the tool prep and video really helped.

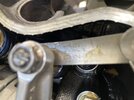
I found that I had been “hunting” for the timing marks and was fumbling between both sides when I remembered a post about checking rocker arms for looseness then BAM! I was right on the money for sight marks for cylinder 2. Since I was there, I did #2 first.

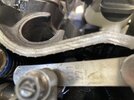
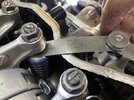
The intakes were spot on at just a tick over .17mm’s (.178mm’s to be exact). This seemed to be the case for all the intake valves across the board and all the exhaust valves were slightly tight.

I went ahead and adjusted them to .279 mm’s for all four exhaust valves.

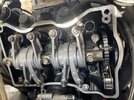
What a joy to work on this motor; easy access and not too much to remove in terms of body work. Actually, I only removed the belly pan for easier access for spark plug removal.

I’ve had lots of bikes in my past with my most recent being 2009 Hypermotard 1100 S and I really enjoyed working on her (not much needed other than regular maintenance). I enjoyed tuning the suspension and installing farkles. But valves on the duc took me about 2-2.5 hours due to fuel tank removal and replacement.

The heads were easily accessed once the fuel cell was removed but you needed shims in the event there was adjustment required. During my ownership, I only had one tight exhaust valve on the horizontal cylinder and I was able to manually shim using very fine grit sandpaper (.003 off so I removed .01).

Having all four exhaust valves on the nc700x showing tight, all I needed was my 10mm wrench and a flathead screwdriver!

That would’ve resulted in placing an order for shims and waiting if I were not comfortable shimming manually like last time if this were the Ducati.

Nonetheless, this port is worthless without pics...
 

Attachments

  • 1C643760-17F4-4AAF-9492-EE685DA8996D.jpeg
    1C643760-17F4-4AAF-9492-EE685DA8996D.jpeg
    222.3 KB · Views: 111
  • 646D382F-8097-4B05-90F1-3F0F75AB9DD3.jpeg
    646D382F-8097-4B05-90F1-3F0F75AB9DD3.jpeg
    219.6 KB · Views: 109
  • DE496B1C-3DDC-4A35-AFB9-7AFD265CDB58.jpeg
    DE496B1C-3DDC-4A35-AFB9-7AFD265CDB58.jpeg
    294 KB · Views: 110
  • CA9A6543-BCB7-446D-94D9-5946C92F93B7.jpeg
    CA9A6543-BCB7-446D-94D9-5946C92F93B7.jpeg
    363.8 KB · Views: 113
I did mine at 8500 miles, and found it to be about the same. Kinda reminded me of my old Airhead BMW’s in terms of ease of service. Two valves needed some very minor adjustment.
I used to do the BMW’s every other oil change, just to make sure. Easy Peasey!
 
I see in pic #4 that the spark plugs hadn't been removed for valve clearance inspection.
Did you find that the crank was easy enough to turn with a 3/8 ratchet against the engine's compression?

Never mind.
I see in pic #3 when you're doing an intake that the spark plug cap has been removed.
I should have paid more attention and not looked at pic #4 first.
 
Last edited:
I see in pic #4 that the spark plugs hadn't been removed for valve clearance inspection.
Did you find that the crank was easy enough to turn with a 3/8 ratchet against the engine's compression?

Never mind.
I see in pic #3 when you're doing an intake that the spark plug cap has been removed.
I should have paid more attention and not looked at pic #4 first.
To answer you question from my point of view, I don’t remove the spark plugs for the valve adjustment on the NC and I have no trouble setting the camshaft in the correct position. I’ve always considered spark plug washers to be sort of one time use devices, so I don’t remove and reinstall sparks plugs needlessly. My NC is at 47,000 miles and I don’t think I have ever removed the spark plugs as there has been no reason to.
 
You answered my question.
Some engines are literally impossible to rotate at the crank without the plugs removed.
I didn't think the NC with 2 small cylinders and low compression would be an issue.
A Ducati or KTM would likely be a different story.

I don't worry about crush washers being reused.
As long as there is no debris on the cylinder head contact point with the plug, I see no reason why a washer can't be re-used.
The owner's manual states the correct way to properly retorque the plugs without a torque wrench and without a new crush washer being used.
 
I didn't know I was supposed to pull the plugs out lol.

I'd like to know who put the cylinder-position viewing window behind the frame— and then put a torque spec on something you can't put a torque wrench on
 
I see in pic #4 that the spark plugs hadn't been removed for valve clearance inspection.
Did you find that the crank was easy enough to turn with a 3/8 ratchet against the engine's compression?

Never mind.
I see in pic #3 when you're doing an intake that the spark plug cap has been removed.
I should have paid more attention and not looked at pic #4 first.
Removing the plugs were not necessary but I wanted to see their condition anyway since this bike is newly in my possession.

I did find that with the plugs removed, the cylinders turned very easily to the point of over-correction using just the weight of my drive socket. Using some shop towels as support, I was able to fine tune the rotation in order to perform the adjustments.

Next time around, I will likely leave the plugs in unless it’s time for their service.

Next service interval will include:

  • Air filter
  • Oil filter and oil
  • Plugs
  • Possibly fork oil or emulator upgrade
  • Rear shock removal with an attempt to install a rear shock from an aprilia mana gt which has preload and compression adjustments.
  • Check/grease bearings
  • Check/adjust chain

As the farkles arrive, they will be installed and thoroughly tested...

Until then...

Happy riding and happy new year!
 
I didn't know I was supposed to pull the plugs out lol.

I'd like to know who put the cylinder-position viewing window behind the frame— and then put a torque spec on something you can't put a torque wrench on
You really don't even need to view the crank and cam position.
Here's a short cut:

As you rotate the crank counterclockwise, watch the valve train operation.
Your 4 stroke cycle order is Intake-Compression-Power-Exhaust.
Start with cylinder #1 (left side of engine as if you are sitting on the bike)
Slowly rotate the crank.
You are looking for the exhausts (bottom 2 valves) to open and close.
Immediately after the exhausts close, the intakes will open.
As soon as the intakes close, another half turn will bring the #1 piston up to TDC (top dead centre).
Stop the crank at that point and with your fingers, try to wiggle the intake and exhaust rocker arms up and down.
You should feel free play in the rocker arms and hear light tapping.
That means it is safe to measure the clearances and adjust as necessary.
The same applies to cylinder # 2.
Start by rotating the crank again and watching the valve action of cylinder #2.
 
I didn't know I was supposed to pull the plugs out lol.

I'd like to know who put the cylinder-position viewing window behind the frame— and then put a torque spec on something you can't put a torque wrench on
Having just done this there are two specs in the service manual. One with the engine out and one with it in. With it in there is a feeler gauge and a degree of rotation to meet the spec. In short, don't torque down the plastic cover so much that you need to destroy it to take it out next time.
 
Having just done this there are two specs in the service manual. One with the engine out and one with it in. With it in there is a feeler gauge and a degree of rotation to meet the spec. In short, don't torque down the plastic cover so much that you need to destroy it to take it out next time.
I assume by plastic cover you are talking about the plug on the right side of the engine. I think for many people, once they understand that there are only two valid camshaft positions for valve adjustment, based on the viewing of the crankshaft position, and it can be easily determined where the camshaft is by which rocker arms are loose, there is no ”next time” for the plastic plug. There is really no need to remove the plug on the right side of the cylinder head to view the camshaft position. I was “duped” by the directions into taking out the camshaft inspection plug the first time I did a valve adjustment on the NC, but I have never removed it since then.
 
I assume by plastic cover you are talking about the plug on the right side of the engine. I think for many people, once they understand that there are only two valid camshaft positions for valve adjustment, based on the viewing of the crankshaft position, and it can be easily determined where the camshaft is by which rocker arms are loose, there is no ”next time” for the plastic plug. There is really no need to remove the plug on the right side of the cylinder head to view the camshaft position. I was “duped” by the directions into taking out the camshaft inspection plug the first time I did a valve adjustment on the NC, but I have never removed it since then.
Ditto; my first foray in to this motor so I felt the need to triple check. Now that I’ve done it by checking position of stroke, there’s no need to pull the other covers.

Great tips all around!
 
I do t have an NC anymore, but it was an easy to work on engine!
Im thinking about another.
Greg - 47,000 miles? What are you waiting on?
Is it still orange?
 
I do t have an NC anymore, but it was an easy to work on engine!
Im thinking about another.
Greg - 47,000 miles? What are you waiting on?
Is it still orange?
No, it’s green now!
My NC mileage is low because I also ride my Goldwing and 250 dual sport, and scooter. Mileage is split up between multiple bikes.

Good to hear from you, itlives!
 
Ahhh! You earn the 3-bike pass! My current is a 2014 GSA . Awesome ride. Did 4,422 mile trip up to Lake Superior in Sept/Oct. Noisy engine but goes like a fast thing.
 
Ahhh! You earn the 3-bike pass! My current is a 2014 GSA . Awesome ride. Did 4,422 mile trip up to Lake Superior in Sept/Oct. Noisy engine but goes like a fast thing.
3-bike pass? Ha! I had 6 bikes in 2019 but I have since downsized to 4.

Glad you were able to get a bice trip in last fall.
 
I assume by plastic cover you are talking about the plug on the right side of the engine. I think for many people, once they understand that there are only two valid camshaft positions for valve adjustment, based on the viewing of the crankshaft position, and it can be easily determined where the camshaft is by which rocker arms are loose, there is no ”next time” for the plastic plug. There is really no need to remove the plug on the right side of the cylinder head to view the camshaft position. I was “duped” by the directions into taking out the camshaft inspection plug the first time I did a valve adjustment on the NC, but I have never removed it since then.

Correct me if I am wrong. Years ago I was taught as follows :-

Turn the crank forward until You see the intake valves on the cylinder in question open and close.
As soon as they close then continuing to turn the crank, look for alignment of the T mark on the slot provided.
Check that all four valves can be rattled and if so proceed with check/adjust.

I think that basically coincides with what You are saying above ?
Yep.

As for my earlier comment about the necessity of the cam position inspection plug, it will come in handy when you suspect a cam chain jump or you are aligning the cam and crank, but I see no need to pull that plug for a valve clearance inspection/adjustment.
 
When I adjusted my valves I was never able to really nail down which cylinder is #1. From the above post it says cylinder #1 is same side as the clutch lever.
This is a hot topic lately.... #1 is indeed clutch side, and the intake valves are on the top.


See this thread for more details
 
Back
Top