

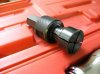
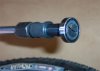
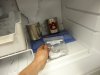
I try very hard not to hammer old bearings out or new bearings in, but it takes a bit of equipment that many people will not have. The bearings are interference fit on the bearing OD. To reduce the possibility of damage it helps to temporarily reduce the interference. Less interference equals less opportunity for damage regardless of the installation and removal method you use. My bearings go in the freezer overnight. I make sure that they are still in the manufacturer's complete packaging and put the package into a ziplock bag and seal it. The wheel is heated twice in the process - once to remove the old bearing and again prior to the installation of the new bearing. Some would say that hammering out the old bearing is no problem, because you are going to throw it away anyhow. What you are not going to throw away (unless you ruin it) is the wheel. If you hammer out an old bearing and it gets cocked in the bore, you can damage the (normally aluminum) bore. After several of those operations, the new bearing can end up loose in the bore. Bearing removal is where the greatest potential for damage is. With the internal spacer, it is difficult to get good contact for a punch (please, not a screwdriver!). Evenly heat the hub with a hot air gun prior to removal. Try to heat the hub and not the bearing. Work quickly while the hub is hot. Try to avoid cocking the bearing on the way out by taking small taps at a number of different places around the bearing. Once one bearing and the spacer are removed, the opposite side bearing is easier because you can tap at the OD. If you want to invest in a tool, look for a good blind bearing puller. Mine has both a slide hammer and a mechanical puller because I am averse to hammers. Either will work. Unlike the jaws on a pilot bearing puller, a blind puller will have a range of collets to fit various bearing ID's. The collet has a very narrow lip on the ID and can easily get in between the bearing and the spacer.
View attachment 25724
View attachment 25725
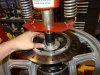
The slide hammer only versions of the tool are pretty inexpensive and this greatly improves your chances of performing the operation successfully. This is a BMW wheel, but it shows the process that I use for bearing removal...
View attachment 25726
View attachment 25727
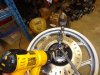
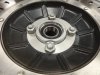
Once the bearings are removed, clean the bores with contact cleaner and lightly grease them. Retrieve your frozen bearing and open the package and place it in a clean place so it is available but not going to get dirty. Heat the bore evenly and again working quickly, place the new bearing squarely in the bore and drive or press it home. Never use force against the inner race, only the outer. You can use a correctly sized bearing arbor or the old bearing to press with. It must go in squarely to prevent damage. Again, being hammerphobic, I use a shop press...
View attachment 25728
View attachment 25732
View attachment 25729
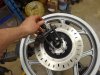
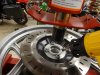
I mount the wheel on press blocks so that there is a path straight through the axle hole. The bottom plated press blocks in this stack are V-blocks. To make sure that I have the spacer square and centered, I place the axle in through the lower bearing and spacer and just into the upper bearing. It is held by a piece of cardboard across the lower blocks and is easily pushed out of the way as the second bearing is pressed home. I generally use the old bearing as an arbor.
View attachment 25730
View attachment 25731
ETA: I have done a couple of BMW's this year but I haven't changed the NC bearings yet and do not know the specific arrangement, but these procedures ought to apply. My SOP is to routinely change sealed wheel bearings at 40,000 miles or five years whether they need it or not. I had a front wheel bearing fail on my ST1100 at 40,000 miles and it felt perfect when I installed the latest tire. It grabbed a couple of times and squealed like a cat was caught in it. That is more excitement than this old man needs.
View attachment 25724
View attachment 25725
The slide hammer only versions of the tool are pretty inexpensive and this greatly improves your chances of performing the operation successfully. This is a BMW wheel, but it shows the process that I use for bearing removal...
View attachment 25726
View attachment 25727
Once the bearings are removed, clean the bores with contact cleaner and lightly grease them. Retrieve your frozen bearing and open the package and place it in a clean place so it is available but not going to get dirty. Heat the bore evenly and again working quickly, place the new bearing squarely in the bore and drive or press it home. Never use force against the inner race, only the outer. You can use a correctly sized bearing arbor or the old bearing to press with. It must go in squarely to prevent damage. Again, being hammerphobic, I use a shop press...
View attachment 25728
View attachment 25732
View attachment 25729
I mount the wheel on press blocks so that there is a path straight through the axle hole. The bottom plated press blocks in this stack are V-blocks. To make sure that I have the spacer square and centered, I place the axle in through the lower bearing and spacer and just into the upper bearing. It is held by a piece of cardboard across the lower blocks and is easily pushed out of the way as the second bearing is pressed home. I generally use the old bearing as an arbor.
View attachment 25730
View attachment 25731
ETA: I have done a couple of BMW's this year but I haven't changed the NC bearings yet and do not know the specific arrangement, but these procedures ought to apply. My SOP is to routinely change sealed wheel bearings at 40,000 miles or five years whether they need it or not. I had a front wheel bearing fail on my ST1100 at 40,000 miles and it felt perfect when I installed the latest tire. It grabbed a couple of times and squealed like a cat was caught in it. That is more excitement than this old man needs.
Attachments
-
 00bearing.jpg57.6 KB · Views: 1,035
 -
 00bearing 2.jpg24.3 KB · Views: 1,446
 -
 aaaa1-M.jpg79.2 KB · Views: 819
 -
 aaaa2-M.jpg70.2 KB · Views: 1,237
 -
 aaaa6-M.jpg38.9 KB · Views: 811
 -
 aaaa4-M.jpg76.2 KB · Views: 804
 -
 aaaa7-M.jpg66.8 KB · Views: 785
 -
 aaaa5-M.jpg63 KB · Views: 780
 -
 aaaa3-M.jpg74.3 KB · Views: 793
Last edited:


