• A few people have been scammed on the site, Only use paypal to pay for items for sale by other members. If they will not use paypal, its likely a scam NEVER SEND E-TRANSFERS OF ANY KIND.

What's your top recommend mod?

A center stand is the only 'essential' you're missing, and I see you already plan to get that. A different windscreen was important to me (vs the factory fly screen). A different seat is essential if you hate the factory one, or not if you don't. I find a couple of RAM ball mounts on the handlebars quite handy.

I like my PIAA LED auxiliary driving-pattern lights, but they're pricey (likely because they did a bunch of actual engineering and have an outstanding pattern) so most don't seem very interested.

I have every accessory Honda offered on my 2012. Luggage was important to me, and you have that coming. The wind deflectors do little, but they do a little. Former member Strat tuner made a rather extensive wind protection set-up out of lexan at home. Look up his old threads on it if you want more wind protection as the seasons get colder.

The NCX is an outstanding commuter!
Agree on PIAA. Well engineered but a bit spendy.
 
  • Like
Reactions: MZ5
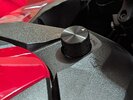
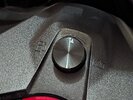
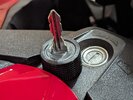
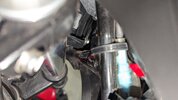
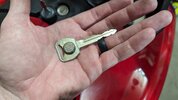
I'm planning to post photos of all my mods in about a week (waiting on a few more parts), but I'm really pleased with how the frunk knob turned out and wanted to share. Also, while I was messing with spare keys and JB Weld I decided to use a magnet to hide a spare key between the frame and fairings. There's a nice flat(ish) spot on either side of the fork. In one image I've got the edge of the key peeking out slightly so it can be seen.
 

Attachments

  • PXL_20231105_131537085.jpg
    PXL_20231105_131537085.jpg
    2.2 MB · Views: 33
  • PXL_20231105_131547326.jpg
    PXL_20231105_131547326.jpg
    2.6 MB · Views: 33
  • PXL_20231105_131625307.MP.jpg
    PXL_20231105_131625307.MP.jpg
    6 MB · Views: 39
  • PXL_20231105_131952427.jpg
    PXL_20231105_131952427.jpg
    1.8 MB · Views: 39
  • PXL_20231105_132032439.jpg
    PXL_20231105_132032439.jpg
    1.8 MB · Views: 37
Finally wrapped-up all my inital modifications.

  1. Center Stand
  2. Givi Crash Bars
  3. Givi Side Rack w/ 22L Panniers
  4. Givi Top Rack w/ 52L Top box
  5. Quad Lock charging phone holder
  6. Offset Riser
  7. Barkbuster hand guards
  8. Sykik TPMS
  9. LED headlight bulb
  10. AUX led lighting
  11. Frunk knob
  12. Denali Sound Bomb
  13. Seat lift modification

I seem to be hitting some sort of text limit so this will be a series of posts...sidebike.jpgluggage.jpglockcable.jpgabovebike.jpgfrontbike.jpgsoundbomb.jpg
 
  1. Center Stand
Why: Additional functionality when performing maintenance

Installation: Mostly quick and straightforward. Used a ratchet strap to hook spring in place.

Initial thoughts: I had to install new tires immediately upon receiving the bike. Since installing the center stand I have removed and replaced both wheels at least once and it’s a much nicer, and I think safer experience. I’m glad it was my first upgrade. I almost always put the bike on the center stand when doing anything to it.

2. Givi Crash Bars
Why:
Primarily as a mounting point for auxiliary lights. I also like the way they look and I imagined they’d provide a bit of protection if the bike were to tip over.


Installation: Pretty quick and straightforward. If I had to do all my mods again I would wait until I pulled the fairings off for wiring various things. It would have been slightly easier to get to and work around the mount points.


Initial thoughts: THEY WORK! Hahaha. Um… I installed these immediately after the center stand. I installed the stand, put the crash bars on, and took the bike down off the stand for the first time. I embarrassingly goofed the first dismount pretty bad and the bike fell onto its starboard side, pulling me down on top of it. I was MORTIFIED . Fortunately the crash bars worked really well. No damage to the bike at all. There’s a slight blemish in the paint of the starboard crash bar where it made contact with the garage floor.


3 & 4. Givi Racks and Panniers

Why: After quickly learning that throw-over saddle bags weren’t much of an option on this bike. I decided I needed a place to put gloves/groceries/beer/laptop bag/work stuffs.

Installation: The hardest part of this installation is figuring out all the parts you need. What goes with your bike and what works together. I found the top rack that worked with the side rack. It wasn’t until parts arrived that I realized I also needed a “top plate”. Once I finally had all the pieces it went together pretty well. The instructions Givi sends with its stuff never seems to be very detailed, and primarily consist of poorly drawn illustrations. I find myself saying “wait…which bolt is that?”. You really need to lay everything out and think through the install before starting. I had to re-fit the top rack brackets twice before it all started to come together. Also, the threads hidden behind the passenger pegs were absolutely filled with dirt. The majority of my time was spent thoroughly cleaning these so that they would accept the Givi bolts and not immediately corrode. The bolts that hold the side rack come VERY close to the rear fairings. Probably too close. Remember this if you ever have to pull the main side-fairings because any flex of the rear fairings will press against the bolts and scratch the paint.

Initial thoughts: I like them. I got the smaller side boxes (EN22), and I’m glad I didn’t go any bigger. They don’t hold a ton of stuff, but I think they look nice on the bike but I can always get bigger boxes if I need them down the line. I got a pretty large top box. The 52 liter Trekker box looks pretty big but it’s light-weigh and I don’t notice when riding. It will hold my classic 46L Aerostitch AND a Shoei full face helmet (does not’ fit in frunk). And that’s a HUGE plus for me. I got the back rest for the top box and the wife likes that a lot. I took some coated steel wire that kinda matches the bike and crimpped it to the two mount points of the top box, just under the back rest. This is a nice place hang stuff w/ a carabiner or lock a helmet to. It’s not as secure as a bike lock through the frame, but it’s very convenient as a moderate theft-deterrent.
 
5. Quad Lock Wireless Phone Charger


Why:
To ride w/ Waze, music, see incoming phone calls, texts.


Installation: The phone mount takes only seconds to install. The charging part takes a bit more time and I wired all my accessories at the same time, taking the better part of a day. For this accessory I’m using the Honda OEM sub harness for power.


Initial Thoughts: I rode with the phone mount for a while before I got around to wiring the charging function. The phone mount is very nice and secure. I can place my phone either vertically or horizontally (I always go horizontally). With my 40+ min work commute the charging feature makes a big difference. Before I got around to wiring it, I’d always make sure my phone was on the charger at work in the afternoon, so I had enough juice for the ride home. Admittedly I’m not getting great battery life from my phone. Now it’s not a concern. Whatever my battery level is before I leave, it’s always higher when I get to my destination :) .


6. Offset Riser


Why:
I’m 6’2” and the stock position of the bars are slightly uncomfortable for me. I also received the bike with a Puig windscreen that was touching the bars at full lockout. Lastly I wanted to install handguards and knew I would need the extra clearance.


Installation: I was really worried about cable length but had no issues

whatsoever.


Initial Thoughts: I bought a fairly inexpensive no-name riser that’s 25.8 mm higher, 20 mm closer. I wasn’t sure what sort of effect those small numbers would yield, but WOW I couldn't be happier with this purchase. The bar position is noticeably more comfortable and I’ve got plenty of room for my barkbuster handguards even with the Puig windscreen. I could have still used the Honda top piece with this riser, but opted not to so that I could center the phone mount.
 
7. Barkbuster Handguards


Why:
Deflect cold air away from hands at highway speeds.


Installation: I wasn’t crazy about having to remove the stock bar weights. I also had a harder time with this than I expected, breaking the retaining clips on both sides. I did NOT like the bar inserts that came w/ the handguard set. The inserts just felt light, and cheap and I had a difficult time getting them adjusted so that they were tight, but not binding against the grip (throttle side). The lighter weight didn’t increase vibration by a crazy amount, but it did a little and was noticeable to me when riding.

I was still happy with the installation and could have lived with it. It wasn’t until AFTER I had them installed that I noticed some posts on here about installing them with the stock bar weights!! I ordered replacement clips, the barkbuster additional weights (why not), and 90mm bolts (for the increase in length).


Initial Thoughts: This is the setup! I love having them installed with the stock weights AND the added barkbuster weights. It feels very smooth and solid. I have the VPS guards on and think I might benefit from the additional coverage provided by the “Storm” guards. I’m awaiting shipment and we’ll find out. As it stands the VPS guards do a pretty good job reducing wind-chill. However, they have an odd notch that lets a good amount of air through.


8. Sykik TPMS


Why:
I don’t know how often I would realistically check tire pressure without them. But mostly I felt like they would be “nice to have”.


Installation: Given how centered the valve stems are, I’m not sure how critical having steel valve stems actually is. I still convinced myself that it should be done to compensate for the added weight of the sensors. This went pretty smoothly up until I dropped a stem inside the tire requiring me to pull one side of the tire completely off the rim. Yay. The Syskik system itself is very easy to install. You just screw the caps on and mount the display to the handle bars.


Initial Thoughts: It’s great! I haven’t had to change the display so It’s been entirely hands-off. The screen comes on when the bike moves and turns itself off when it’s been sitting for a while. I’ve checked them periodically and readings seem to be pretty spot-on. I like being able to see tire temps change as I ride.


9. LED Headlight bulb


Why:
I was not happy w/ the halogen headlight output.


Installation: The Beamtech bulb was an easy direct swap-out. I found it necessary to aim the light housing much lower after installation.


Initial Thoughts: I’m very happy with the results. The beam pattern is pretty close to the halogen bulb, but the output is much nicer. IT DOES RAISE THE BEAM CUTOFF quite a bit. I adjusted the headlight housing to compensate and the end result is very nice.
 
10. Aux/fog LED lighting


Why:
My commute requires a good amount of back-road night-time riding. I wanted some redundancy to the single headlight in case of failure. Increased lighting would also be nice, but not primary concern.


Installation: I bought two fairly inexpensive LED projector lights to clip directly on the crash bars. The physical installation of the lights is a non-event. The electrical was part of my overall accessory wiring. For everything listed here and for whatever I add down the line, I used the splitter sold by Eastern Beaver (EB), to install both the OEM Honda Sub Harness AND the EB NC750 harness. I used two switched circuits from the EB harness to turn these lights on/off with the bike. There’s no additional switch as they are simply attended to be driving light redundancy. The lights I ordered throw a beam with a pretty clean cutt-off at the top/bottom. They’re both aimed so that their cutt-off is just a hair lower than the primary headlamp. They’re plenty bright and I don’t want to annoy other drivers by having them throw light any higher than that. The lights I bought were cheap ($50 with wiring harness or $15 without), so I wasn’t terribly surprised when I stripped one of the mounting screws right away. I filled the threads with JB weld and re-tapped. That’s holding really nicely but I’m fully prepared to replace these if/when needed. The circuits they’re on will support pretty much anything I could want to mount on the crash bars.


Initial Thoughts: They do what I need. They’re not 8000 lumens or whatever crazy number they're marketed to be, and I didn’t expect they would be. Also no way are the 90W each (as advertised), but I did set them up each with their own 10A circuit so that 90W flamethrowers could be installed in their place, should I ever decide I need that :).


11. Frunk Knob


Why:
Cause you guys have frunk knobs and I want to be cool, too :) .


Installation: Ace Hardware cut my HD109 key (for free!). I lopped off the top and used JB weld to embed in a 25mm Aluminum radio knob.


Initial Thoughts: I friggin love my frunk knob. It’s probably my favorite modification!


13. Denali Sound Bomb


Why:
Another thing that sounded like a good idea and nice to have. The stock horn isn’t very loud.


Installation: I’m not crazy about Denali’s wiring harness. I used it, but modified it heavily to shorten some of the excessive leads, improve water-proofing, and to integrate with the OEM horn using insulated spade connectors instead of splicing into the existing harness. The horn connections in the harness had exposed wiring that I covered with silicone to prevent corrosion. I noticed several review’s stating that their horn only worked for a short period of time. I’d be willing to bet the Denali wiring harness is what failed them. I also don’t love the single bolt mounting system for the horn.


Initial Thoughts: It’s okay. It’s louder. Is it 4x louder? Probably not. I think I expected the tones to be a little bit…lower? I’m not sure. It’s definitely better than the stock horn, so I’m keeping it.


14. Seat lift modification


Why:
Like most people, i find myself sliding forward in the sloped seat


Installation: I used the chair feet covers and simpson strong-tie method that I think I saw here somewhere.


Initial Thoughts: I removed the mod. The height is nice but I don’t think it’s nice enough to justify the unsightliness of the gap. I tried a couple things that looked a little better. I tried pipe insulation and other closed foam inserts. I was just never able to get it a point where I liked the way it looked.
 
Thanks for documenting your modifications here with such good detail. The thread should be helpful to others contemplating such modifications.
 
Pretty much in the order that I added them:
1 Center Stand (ordered day 1)
2 GPS Mount (ordered day 1)
3 USB port in frunk (ordered day 1)
4 Taller & Wider Windscreen (decided to replace OEM screen on day 1)
5 Handlebar Risers
6 Lowered Pedals
7 Hand guards / wind deflectors
8 Heated Grips
9 Rear Rack with Side Cases and cargo plate
10 Crash Bars
11 Aux Lighting

Things being considered
A - raise the front of the seat
B - highway pegs
C- Hippo Hands
 
I hadn't considered the effects of cold riding on my phone while mounted to the motorcycle. This morning was the second time my phone shut down in the middle of my commute. Both times temps were below 36. I guess I'll have to keep it in my pocket on these cooler mornings...
 
I hadn't considered the effects of cold riding on my phone while mounted to the motorcycle. This morning was the second time my phone shut down in the middle of my commute. Both times temps were below 36. I guess I'll have to keep it in my pocket on these cooler mornings...
Don’t know what phone you have but I was amused that when snow skiing my older iPhones would shut down with a message saying they were too hot.
 
I have numerous added accessories on my bike but if I had to pick my top one, as in the OP question, I would choose my Xprite DEL auxiliary driving lights; truly the number 1 item for safety. Light temperature (°K) very different from the single headlight (weak and yellowish) for a greatly increased conspicuity. Provides also redundancy for the single headlight and increased lighting area when driving at night.
 
If anyone is curious about the difference in coverage between the barkbuster "storm" and "vps", here's the vps sitting inside the storm. In practice, imagine the vps shifted about .5" to the left. That bit before the notch in the vps is fully covered by the storm. The whole thing is also upsidedown, haha sorry. PXL_20231115_000728129.jpg
 
BLUF (Bottom line up front): what mods do you most recommend?

Hi! I sudo-inherited (bit of a story) a 2013 NC700x. Prior to this I hadn't ridden in 12+ years (I had a Vulcan 800 in my 20's).

I'm really digging this bike. I have become pretty committed to making it a daily driver, commuting 1.5 hrs a day in Pennsylvania.

I had some throw-over saddle bags but was immediately turned-off by having to remove them to refuel... So I have Givi top/side racks and cases on order.

I noticed the headlamp isn't great (morning commute is in total darkness) and have also ordered a plug-in-play LED headlamp bulb, but also crash bars and a pair of cheap aux lights to mount on them. (I ordered the Honda sub harness and relay as well)

The last thing I ordered was a Denali soundbomb horn with mount and wiring.

Are there any essentials I'm overlooking?

Thanks!

JC.
Now that you have made a few mods, which ones are you happiest with? Which ones do you wish you did differently?
 
Now that you have made a few mods, which ones are you happiest with? Which ones do you wish you did differently?
Nice way to bring it back around!

As several others have alluded to, I think the center stand is essential.
If I could only do one other mod, it would be as much of the luggage as you could consider a single modification. I guess top box as a priority, but side boxes are pretty important to me too.

The handguards would be next. They're also The one thing I would change, and I did change them.
I mentioned this in the breakdown, but I wouldn't recommend to someone that they follow the barkbuster instructions for handguard installation. Keep the OEM weights and affix the guards with with two-1.0 by 80mm flat-head allen socket screws. Better yet, get 90mm screws and add the barkbuster end weights.

Two things I haven't done yet, but have eyes on are heated grips and some USB outlets in the frunk. Also maybe a light inside the frunk lid??? Not sure. I spend way too much time in the dark.
That is a great suggestion and also a reminder on the bar end weights. I took them off when I installed the handguards and found out from some contributors here that I probably would have been better off leaving them installed. Thanks for the reminder to put them back in! Glad that you are happy with what you have done so far and the frunk light idea is pretty cool. I don't recall it being done before by contributors here on the forum; at least I don't recall it being mentioned here.
 
Last edited:
Back
Top