• A few people have been scammed on the site, Only use paypal to pay for items for sale by other members. If they will not use paypal, its likely a scam NEVER SEND E-TRANSFERS OF ANY KIND.

DIY windscreen

learning....sharing the failures with the success...

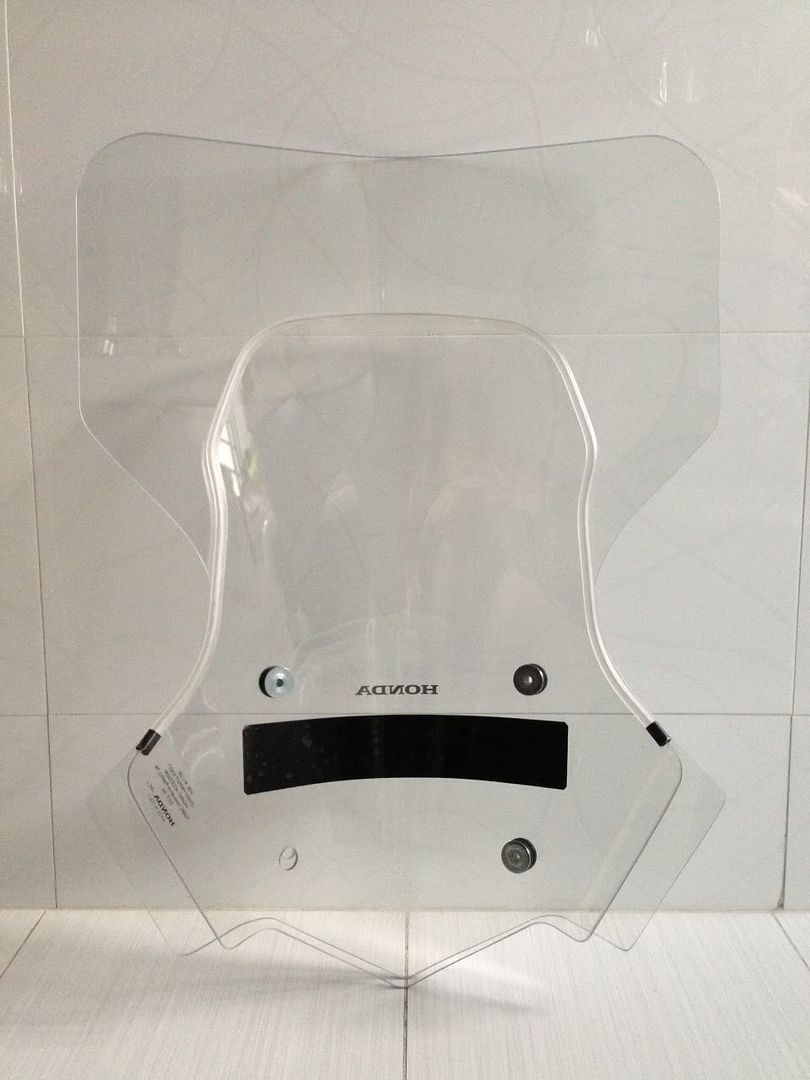
The four hex bolts that hold in the stock windshield are seated in rubber gromets. The gromets (if that's the correct word!) have a small o-ring lip around the bottom, and when you push them into the holes, the lip goes out the back and holds the gromet in place.

The gromets couldn't tolerate the outward pressure the lexan exerted. Remember that bending the lexan to curve gives it increased rigidity, but it means that the lexan is constantly pulling on the rubber gromet since the shield wants to UN bend.

That amount of force is enough to pull the gromet out of its hole...and I found it out when I took the cover off my baby yesterday morning. Both left side gromets gave in to the constant lexan pull and came out of their holes. It's a good thing that didn't happen on the freeway!

My solution was to bend the lexan shield so that it would no longer pull at the gromets. Just like the OEM shield, my DIY is now creased down the center so that it doesn't pull on the gromets. It mounts in place just like the OEM shield.

Creasing the shield don the center provided two benefits:
1) it stopped the shield from pulling the gromets out!!!
2) it increased the shields rigdity... It doesn't bounce like it used to and bends almost not at all in the wind.

(freeway testing will come this weekend)


How did I bend the Lexan?
I did a lot of reading on the internet, and learned from that. Here's what I did...I...
  • bought a $22 heat gun from Home Depot (Wagner HT1000).
  • placed the flat lexan windshield on the edge of a table...the edge running along the vertical center of the lexan.
  • put something really heavy on the side of the lexan on the table to hold it down
  • sat in a chair and bent the lexan down and held that bend with my left arm
  • used my right hand to hold the heat gun 2 inches or so above the bend
    (heat gun has only two settings: low and high... I used high)
  • move the heat gun up and down the bend in small, overlapping, strokes to heat it SLOWLY
  • did that for about 20 minutes...(first time! I had no idea how long it would take)
  • let go and checked my work now and then to see if it was holding the bend
  • got encouraged when I could see that it was!

I had read how heating it too fast would cause it to bubble, so I was careful to keep the heat gun moving along the lexan bend in small overlapping strokes two inches or so abouve the surface. I concentrated on the bottom side since that's where the bend needs to be most. (that's where the screws/gromets are.)

Doing it this way slowly over 20 minutes with an average heat gun (not a flame throwing monster) produced a permanent bend WITH NO BUBBLES!! Wow...

I will get pictures on the next entry...

Next time I do this, I'll figure out a more elegant way to bend the lexan that doesn't involve several heavy objects and my left arm! Also, I reflect that the crease doesn't need to go all the way to the top... I could have creased just the first 1/2 or 3/4.... leaving the top half as is....and got good rigidity while still solving the gromet-pull problem.

Disclaimer: Making a windshield is my own choice, and my experiences are purely informational. You are responsible for any modifications you make. I am not.
 
Last edited:
OK...here are two photos of the "creased" windshield.
I will always bend the lexan, now that I know how.

NB: I've removed the stock gromet/hex screw holders and used stainless steel "zip ties" instead.
There are four. Each has 100lb tensile strength. It seems unlikely that two or more would fail at the same time.
They are also easy to replace.

lexan04.JPG


and here's the 2nd.
lexan05.JPG
 
Last edited:
If you are inspired by all this to make your own windshield... please post and maybe show some pictures.
I'd love to see.
cheers,
StratTuner
 
Your windshield looks great! Just out of curiosity, since you are using the ties instead of the stock well nuts for attachment, did you put any rubber washers or cushion between the windshield and bike mounting points? Please give us a ride report when you get a chance.

Thanks,
Bob
 
Your windshield looks great! Just out of curiosity, since you are using the ties instead of the stock well nuts for attachment, did you put any rubber washers or cushion between the windshield and bike mounting points? Please give us a ride report when you get a chance.

Yes, I used square sections of "gripper" rubber.... it's the kind of stuff you find in the hardware store near furniture glides. It's meant to stick to the bottom of furniture to keep it from sliding or damaging the floor.
There are rectangular pieces of that on top of the holes.
I used a screw driver to punch through the rubber, once it was in place, and threaded the zip ties through.
The windshield is resting on those rubber squares.

I went out on the freeway at 70mph, and there was no bending of the windshield.
It's better than ever with the crease down the center.

The windstream still hits at the top of my helmet.
 
Did you consider using a rounded surface (sono tube for instance) when bending the Lexan? I would think you would get a better "curved" shield. Perhaps you could also do a "lip" along the top of the shield. I have made numerous shields for my batwing fairing on my Kawasaki 1500. Mainly differing heights. Yours looks good and perhaps when I get an NC I'll give it a try.
 
I think next time I make a windshield, I do want to use something round. I used the edge of a table for that one. Round would look better but it means I have to heat more of the lexan's surface area.
 
i like the results!
how about this technique for next project?

Form Bending Acrylic and PVC Plastic - YouTube

you cut the glass,then put it into stove\oven at temperatures described in comments and then-place it on simple form. another technique would be molding. place the glass on the form into the oven and allow it to form. youtube is a great source of all this information and various techniques. i love all this stuff! Thank you for sharing

I might try that one again.. the first attempt didin't work. It came out of the oven completely cratered....
The youtube video makes it look soo easy...
 
it sure is.. they are professionals with huge professional electric stove. and there is at least two of them holding the glass. i was thinking of some form made from MDF,covered with felt. like on this vid,but longer-

Woodworking Information : How to Bend Wood to Make Furniture - YouTube

and then you just place hot and already cutted glass on it? it should allow you to form\bend thicker glass.

note that they mentioned fairly low temps for it
 
Good thread.
I was considering making a windscreen as well. I did one for an XJ I had years ago.
I did a bunch of googlizing, and kind of left it there. Then I saw this thread. Got my inspiration back up.

I did a large 'wave' shaped piece of acrylic years ago for a balcony balustrade in the main salon of a 96 foot motor yacht I was working on. I made a mold/ buck in the wave shape I wanted. Dragged that and the piece of acrylic to a place in Vancouver with a huge oven, popped both the mold and panel into the oven and waited for it to relax and settle into the mold shape. Bingo. It turned out perfect.
I had thought to try and replicate at least part of that process for the NC screen.

I use vacuum bags on a regular basis these days....and thought I might be able to incorporate that tech into the process. It all depends how hot the panel needs to be I guess.
Also was also thinking about vacuum forming...not bagging....but forming. That would work I am pretty sure. Not sure if it is necessary for a simple single curve. More likely to simplify making a compound curve perhaps.
Meh. Either way, you have done some great work, had fun, and learned a lot. I love to 'watch' other people doing stuff like this...as well as doing it myself.
Thanks for the thread and the updates. Good stuff.
 
Got my inspiration back up.
i like that!
the machine they are using is pretty strong,but you got an idea-

Vacuum Forming Acrylic - YouTube

not sure how you can apply a vacuum bag to a hot glass,but hey..what a f**. that's why we are here. to share the ideas. OP-look for wholesale commercial plastics distributor in your area. you should be able to get any acrylic glass for at least 30% cheaper than lowes or home depot.
i bought few huge pieces for my bedroom window(to keep it warm and VERY quiet(at least during the winter)) from my local distributor and i love it.
 
another thing to try out of acrylic molding would be a wind deflectors :D
i'm personally looking for solution for a cheap add on on top of my puig screen
 
looks great,cost a little fortune. if i remember correctly-it cost MORE than the big one. that's one problem. the second one-no one is selling it in US
 
I had a customer once by the name of Frank. Was a retired marine sgt who lived though Korea, Viet Nam, and who knows what else. Frank is one of the best riders I have ever known. At 85 Frank bought a Suzuki Bergman from me. Frank at 85 was going from Texas to California to see his daughter on the Bergman. His kids who lived in Texas threw a 1st class fit, because Frank was riding to California. In the end they made Frank give his word that he would not ride the Bergman to California, or out of Texas for that matter. So, Frank gave his word that he would not ride the Bergman to California, or out of Texas. A few weeks later Frank was the cover story on the front page of the newspaper. Frank drove his Bergman, and took a picture of every state welcome sign in the state of Texas. Folks, that is 3848 miles to be exact.

The next summer all the kids agreed to let Frank go on the shorter tip to California. Frank came in before going to California and asked me how much a Givi windshield would cost for his Bergman. I told him the price, but never seen Frank again. Frank made his own windshield. Frank could build anything, a real talent. According to his daughter, that home made windshield like to took his head off in route to California. So, I called a friend of mine in California, who between he and his wife have the most tattoos I have ever seen on two people in my life. Great people, we meet on a Yamaha trip to the Cayman Islands. So, when Frank got to southern California, he went to Chaparral Motorsports, and my friend personally installed Frank's new Givi windshield. That Givi windshield Frank has fallen in love with, and he even agrees that he will never build another windshield. Moral is leave somethings to the pros.
 
Great story OCR! you mean burgman, right? the scooter? i love that thing. specially with big givi screen. i did the maintenance on it and my friend at Cape Coral let me ride on it around for couple weeks. what a comfortable ride that is!
here is the pic of it at sanibel island ,fl:

https://lh6.googleusercontent.com/-...AAAA4E/x2RDkWgTu5s/w1121-h841-no/DSCF4681.JPG

i got up to 72mpg on it. great dash-shows everything. temp outside,mpg etc. i was about to buy one off the Craigslist this spring,already took the money and the tools to check few thing before i buy,but the guy sold it to a dealer,who post it for sale week later for $500 more. it was 2008 with 5K miles on it ,top tank and we agreed on $2800.
 
Last edited:
but my messed up mind just won't leave that idea about DIY. here my latest thought that comes into my head while i was sitting on the toilet seat,doing my business(sorry for details)

the top deflector(like one on that picture above),but on hinges(you can use toilet seat hinges too) ;)
while you ride on low speed-the deflector is folded down(pretty much like closed top of the toilet seat,(imagine it ,positioned vertically,with hinges on the top). but when rider speeds up-all you need-one small move to lift up the deflector and it will stay up under the wind pressure. or it might change the position by itself and unfolds up(like raised cover of the toilet seat.

Toilet-Seat.jpg
 
You don't want anything that you can't lock in your line of sight. Something like that has the potential to flip up at speed without your interaction. It could do so with enough force to stress or crack the base mounting windshield, which could then chatter and really ruin your day. If you want adjustable, but can't find a solution, look at the existing hardware and figure out how to adapt it to your needs. I adapted the Givi Air-Flo parts to an aluminum base. I have 5-6" of vertical adjustment and the shape throws the air over my helmet in the lower positions so I don't have to look through it.
Full up:
View attachment 4990

Full down:
View attachment 4991
 
Back
Top