• A few people have been scammed on the site, Only use paypal to pay for items for sale by other members. If they will not use paypal, its likely a scam NEVER SEND E-TRANSFERS OF ANY KIND.

Saddlebag braces... home made!

StratTuner

Site Supporter
Joined
Mar 11, 2013
Messages
3,490
Reaction score
58
Points
48
Location
California
Visit site
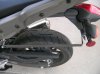
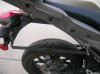
This morning's engineering project is to connect a piece of aluminum flat bar from the rear of the pillion peg to the license plate frame assembly as in this photo. (see where the yellow line is).
ncLS01.jpg
The flat bar will bolt on to the rear of the pillion peg and on to the existing bolt that holds in the license plate frame.
I plan to buy a longer bolt for the tail assembly to accomodate the thickness of the flat bar.
Bolting to the opposite side of the rear pegs should be easy since there are pre-fitted, machined, bolt holes back there already.

What size bolt goes in those unused holes on the inside of the rear pegs? Anyone know?

My plan now is just to go to the hardware store and by 1/2" long 10, 11, 12, 13, 14, and 15mm metric bolts. I figure one of them will fit.... and then I'll know.

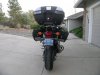
What is the purpose? I plan to strap cylindrical "duffle" bags to the rear hand rails to use as saddle bags. Each bag will hang down off the side rear hand rails.
dufflebag.jpg
The handrails will bear all the weight, the flat bar is just there to keep the bags away from the wheel.
I'm hoping it will be fairly simple to take on and off and keep the bags out of the rear wheel.
 
Last edited:
Rear of pegs take a M8 (8mm) bolt but do not know what size that equates to in USA measurements if different
 
good idea! i have pair of aluminum crutches(present from local hospital to my son)

450.jpg


i might do same out of them. or should i keep them near by and ready? :)
 
good idea! i have pair of aluminum crutches(present from local hospital to my son)

i might do same out of them. or should i keep them near by and ready? :)

I don't understand this post. It's either to be funny or insulting ... I'll presume you meant funny.
 
Good idea. How do you keep the bag from vibration/shaking during riding?

if the bag is secured to the hand rails and prevented from hitting the rear wheel... is that not enough? Even professionally mounted bags shake when you're going down the highway.
 
if the bag is secured to the hand rails and prevented from hitting the rear wheel... is that not enough? Even professionally mounted bags shake when you're going down the highway.
I was thinking that your set-up mounts the bag only on hand rail and the bottom part is free. This would shake the bag when the wind hit the bag during higher speed riding.

The branded bags are mounted at several points and this keeps the bags from shaking.

Perhaps some rubber straps tying the bag to the flat bar will help?
 
I don't understand this post. It's either to be funny or insulting ... I'll presume you meant funny.

Why on earth would he mean to be insulting? Why on earth would you choose to view such a post as possibly insulting? :confused:

How low will the duffle bag on the exhaust side hang down? I'm just wondering if the bag hangs down low enough to be held out by the right side brace, it might be possibly low enough to touch or rest on the muffler. If it doesn't hang down that far, the brace (just going by the angle of the yellow line shown on the left side) might not be high enough to prevent the bag from protruding a bit into the wheel space.

You might very well need some small addition, to put some barrier up just a wee bit higher.

Also, if you used aluminum flat bar, it could be a bit flexy over that span. (I don't know, just speculating from some of my past experimental uses of the stuff) Is it a straight shot on the same plane from the inner footpeg hanger bolt to the rear fender bolt? Could you maybe use 1" x 1" square section aluminum, or does it have to bend from one bolt location to the other?

Great idea to think outside the box! :cool:

in working with it so far, I realize that your assessment that the horizontal flat bar is TOO LOW is correct.

I'm thinking about attaching two vertical "L" shaped pieces to the horizontal. The bottom part of the "L" sticking out to the sides 6 inches.
This would:
- give the smallest about of platform for the bag to rest on
- keep it safely away from the hot exaust
- put to more barriers (vertically) across the wheel well to keep the bag out of there.

I'm thinking the top of the L could be bent to HOOK over the handrails rather than free float.

It bothers me to have to deviate from the simplicity of the single piece of flatbar design, but it seems more structure is required.

Hey my assessment could be all wet, just speculating and doing some armchair DIY engineering ;)

Maybe instead of flat bar or more difficult to manipulate square section, you could use L section material for the main span brace? That way, it would be a little more resistant to bending inwards with force applied to it.
 
What if a round bar went from the bolt hole up to the grab handles, and hooked over them (or something) somehow? Then, a second piece could attach from partway along that rod/bar and go back to the rear holder you want to tie to? Yes, that's 2 pieces instead of 1, but I think it'll offer much better bracing & security options for keeping loose-hanging saddlebags out of the wheel.
 
I've got the basic bracket on. It takes two 8mm 1/2 inch bolts to secure to the back of the rear pegs.
It takes two zip ties to hold it where it goes around the tale section.
ncLS02.jpg
the horizontal bar is better centered. the two pieces of flatbar are joined at the left corner (in this photo) by a single 5mm pop rivet.
The horizontal flat bar overlaps the round steel frame on purpose so that both ends are braced. Makes it harder to push the middle of the horizontal into the wheel well. the flat bar rests against the steel tube for strength. It's not attached to the steel tube in any way. (I did put vinyl tape around the corner where it touches the tube so it won't scratch or wear it down...hopefully. could zip tie it to the tube I suppose...)
One goal of this mod was to make it completely REVERSABLE so that I could put it all back the way it was and no one would ever know I'd done it.

I will have real pictures tomorrow, and I guarantee you they won't look as good as the concept. The joints, especially, are rough cut, and I don't have the proper tools to finish them like a production model would be.


The rear part goes all the way around the tail assembly and "rests" on the metal part of the tail assembly behind the license plate. It's not load bearing, and I wanted to avoid having to bolt it down in too many places. I use zip ties to hold it in place. THE METAL TALE IS THE STRENGTH OF IT, NOT THE ZIP TIE. Zip ties are easy to install / replace and make a perfect fastener for this use. The structure doesn't need them, but I like having them there.

Tomorrow, I'm thinking about adding the vertical "L" shaped bracket to give the bags some modicum of shape and keep the right one off the exhaust.

ncLS03.jpg
hard to draw the two dimensions.
cost so far? about 50$. Would be less but I had to buy more flat bar because I don't measure too well.
 
Last edited:
Maybe instead of flat bar or more difficult to manipulate square section, you could use L section material for the main span brace? That way, it would be a little more resistant to bending inwards with force applied to it.

I've seen the L-section stuff next to the flat bar I buy. It does resist bending better, and I'ld like to use it...just now sure how to integrate it into this project without turning the sharp edge out. It's good for long straight runs, like the horizontal, but not sure what to do with it at the corners.

The other goal is to leave the pillion seat unencumbered so that I don't have unpack bags to fill up.
 
Last edited:
Maybe instead of flat bar or more difficult to manipulate square section, you could use L section material for the main span brace? That way, it would be a little more resistant to bending inwards with force applied to it.

I'm thinking about putting a long section of L-section, as much as will fit neatly, along the inside surface of the main span. I can attach with good old pop rivets, and it won't show or interfere with the bags. It will make the main horizontal span much less flexible!

It seems worth repeating that the hand rails will bear the bag weight. The horizontal span is there just to give the bag something to rest against.

About the bags: The bags I buy are the $20 variety from Walmart. I also line them with foam-core tag board. (Cut the foam-core so that its length fits in the bag. It forms a "U" shape inside the bag leaving the top open.) This gives the bag better uniform structure and doesn't add much to cost or weight! I had a good experience with bag and foam core where I had the bag strapped to the top of the pillion seat on a trip to AZ and back. I may end up with two nylon straps going around the bag, through the hand rails and over the horizontal so the straps hold the bag against both...weight bearing still done by the handles. That would pin the bags to the horizontal and keep the bags from bouncing out to the sides.

All of that makes me think it would be a good idea to zip tie the front corner of the horizontal span to the frame it now rests on. Again.. zip ties are cheap, easy to maintain, and easy to remove.

This will work! It just won't win any awards for style and beauty!
 
just thinking here,instead of zip ties in the back,if you take the reflectors off maybe you could use the holes where they were?,just a helpful idea.
 
Strat,
This thread might give you some other ideas on routing or attachment of the braces.
Soft Luggage/Tailbag With Home made Support. It's in the mods section of the forum. Sorry, but I'm on the iPad and can't figure out how to link to it.

Bob
 
I was also concerned about rubbing the tire with my saddlebags and used a bit of flat steel stock (1/8" x 1") attached to down tube using a radiator clamp/6mm bolt at the front and drilled a hole in the license plate/blinkers mount at the back. It does the job. The saddlebags are strapped to the passenger footpeg mounts and with a strap between the bags at the rear. They don't move around while in motion.
 

Attachments

  • DSCN7821.jpg
    DSCN7821.jpg
    85.9 KB · Views: 305
  • DSCN7825.jpg
    DSCN7825.jpg
    94 KB · Views: 271
  • DSCN7820.jpg
    DSCN7820.jpg
    86.7 KB · Views: 366
No pictures yet. (Didn't get home until after dark). I'll take photos at lunch time.

I put the bags on... first by tying the bag handles to the handrails. That didn't work so well. It introduces to my sag into the bag even with the foam core inserts lending shape.

What worked well was putting two straps all the way around the bag and the hand rails. Tightening them up makes both bags sit where I hoped they would and it leaves the rear seat free for gas fill ups. There's even 3 inches of space between the exhaust and the right side bag.
 
Back
Top