

Xcellor8
New Member
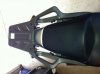
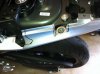
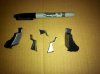
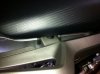
Let me start with this is my first how to write up, so please be kind! Lol! The Honda carrier is a very easy and strait forward install. The instructions that came with it are very clear and easy to follow. After removing both seats I cut out the template supplied with the instructions, aligned and taped to the rear side plastic covers. The second picture shows where I had marked with a Sharpie the material was to be removed. The third pic shows the removed material. Like a carpenter, measure twice (check,double check), and cut once. I used an air saw, then cleaned up the edges with a flat and a rat tail file. The instructions recommended removing both covers, but I saw no reason to do so. I then checked side handles for fit...perfect!. Next I cut and installed the edge trim supplied, shown in pic #4. As stated in the instructions, I assembled the rear carrier and brackets on the bike. Make sure to leave all fasteners very loose until carrier and brackets are complete, then tighten all fasteners starting with the four that attach it to the frame. Overall this is a very easy project, with the hardest part (for me) was cutting the plastic covers (YIKES!) The fit and finish is excellent and overall I am pleased. Cheers!
Attachments
Last edited: